Showing posts with label stamping. Show all posts

Tuesday, October 21, 2014

Where Have All the Bloggers Gone?

Back in the days when I first started blogging (anyone out there remember Yahoo 360?), most of the people you encountered in the blog world were people like me: wfie/mother/working at a noncrafting job/hobbyist. It was still socially acceptable to use a dollar store glue stick in your paper crafting, and you folded your cardstock and creased the edge with your thumbnail (today, those in the know use something called a teflon bone folder, which for a mere $22 will ensure that you do not "leave a sheen to your paper when folding it." Well gosh, how on earth have I survived without that?!)

These days, so many of the bloggers I discover online are anything but hobbyists. They love papercracting, to be sure. And each and every one seems like a truly friendly, lovely person. Talented, without a doubt. But their blogs are crammed with ads,  not only in the sidebars, but within the posts. That's because they are, in essence, employed by a variety of companies to promote their products or online stores. These wonderful people are not like me. They are professional bloggers. Proggers, if you will.

I'm just jealous, you say? You'd be right. But only to a point. 

I appreciate the proggers, truly I do. They do beautiful work and I get lots of ideas and inspiration from their blog posts (and their Instagram feeds, and their YouTube videos). But everything has become so commercialized. At the end of every post is an equally long section with links to each and every product used to make the card, often links to not one but two shops where these products are available. Naturally, they use quite a number of different items to make just one card design.

A friend recently admired a card she saw on a progger's blog. Just for the heck of it, she added up the cost of every item listed. Ready for some sticker shock? $200!! Now, those of us who paper craft probably already have the basics, like adhesive and a paper trimmer. But still!

The videos are especially insidious. You hear the progger's voice (am I the only one in love with Jule Ebersole's chuckle? I think not), sometimes you see their faces, too. You get to watch them create something wonderful, and learn tips and tricks you might not have thought of yourself. Of course, the video descriptions are also jam-packed with links to buy the products used. It's all made so easy! And if this lovely, talented, creative gal - this friend (!) of mine - tells me she can't do without her $25 gadget to round the corners on her cardstock, wow then I'd better click on over and get one! Some of the videos are straight up product reviews, little or no no crafting involved. It's like willingly watching a 20 minute commercial! 

Okay, I know this is a long rant. Luckily I don't do them often. But the truth is, I miss the real bloggers, amateurs like me who just like to make things and share them with others, with no financial gain involved. If you've followed me for a while, you know that most of the time I am using products so old they haven't been available for more than 5 years. If I include the name of the company that makes something I've used, it's because if I were reading the post I might want to know how I could find the same thing. But no one pays me to do it, or gives me free product in exchange.

So where have all the regular bloggers gone?

Tuesday, August 26, 2014

Vacation Haul


I'm sure that most of you (if not all) are not surprised to learn that this is the vast majority of what I bought during my nearly three week vacation in California. I did buy some pants and shoes, but my trip would not have been a success in my eyes if I had not brought back a bunch of crafting goodies. Along with all of the tape refills, I picked up 8 Distress Ink pads (mostly the newer colors), four sets of clear stamps, three embossing folders and one die, a new seam ripper, beeswax (for waxing sewing thread to strengthen it and prevent tangles when doing hand sewing), some fat quarters of fun fabric, a rotary fabric cutter (with replacement blades), blank cards and envelopes, lots of fun cardstock, including two 8.5" x 11" red sheets with a fuzzy nap and some brightly colored glossy cardstock with cool designs (you'll see those up close and personal when they are used in projects). I also got lots of fun stickers, some more Glossy Accents, some Prismacolor pencils, and a Wink of Stella pen that I can't wait to use; it's for adding sparkle to previously colored images. I love the bright sock yarn I got, too. What you see above are the results of visits to my dear friends Michael and Joann, as well as the Piedmont Yarn and Apparel shop (I drop in every year). I also bought a bunch of stuff from a perfectly (watch out, here comes the rant) horrible store called Scrapbook Territory in Berkeley. Not only was the store poorly lit and patrolled by two large dogs with filthy snouts, but the woman there mocked me to my face (for not knowing certain products were discontinued) and laughed at me when informing me that a new product I wanted was out of stock. I should have abandoned my cart and walked out, but I had managed to find a number of things I wanted that I hadn't found at Michaels, so I was weak. But you can be sure I won't ever go back. End of rant, and please forgive me for descending into negativity. Hopefully, it is all out of my system now.


Liat and I went wild at Wal*Mart, picking out colors for a throw she wants for her new apartment in Jerusalem. This will be for the living room sofa. She picked out a pattern with a daisy in the center of each granny square. Should be fun to make, and squares are doable even in this nasty heat and humidity. I already miss northern California weather...

Time to get serious about moving my crafts room upstairs into a room with a ceiling fan and air conditioning. I have a lot of crafting to do!

Monday, August 4, 2014

Mad Libs


Have you ever played Mad Libs? Player 1 asks the other players for a list of words (adjective, animal, noun, and so on) without giving any context. Player 1 then plugs those words into a story and reads out the result, which is often hilarious! I wanted to make some interactive cards, or at least cards with an activity, for my next batch to be sent to Cards for Hospitalized Kids. So I came up with the idea of Mad Libs, and found a website that has them. Instead of generating the story online, I copied out the list and the story into Microsoft Word, and printed them out. You can see the list and story on the far right of the picture.

For the fronts of the cards, I used stamped images of a little dragon reading that a lovely friend sent to me long ago. I'm still working on using up the things I've been hoarding... I typed up the sentiment and printed it out onto pale green cardstock. 

I had a bunch of library card pockets from back in the days when I used to loan kids I was tutoring or friends of the girls' books to read in English. Yes, I am that anal, I made up library cards for my books! Only for the ones I loaned to kids, though, not the books I read myself...

I sponged the pocket with some Distress Inks to make it look less boring. I may yet add some stickers, too. I'm thinking maybe stars... Anyway, the list and story are tucked inside the pocket.

I have a dragon stamp by the same artist who made the reading dragon, so I stamped the liner where my message will go, just to make things more fun.

Of course a project like this is very involved and takes quite a bit of time. But somehow it seems like all the little details really make a project fun, not only for the recipient, but also for the crafter.


The12 Mad Libs cards will join the 20 or so other cards I have already made. In the photo above you can see those cards, most of which also use up stamped images friends have sent to me. At the bottom left you can see that I had just gotten started with my Mad Libs cards, coloring in the reading dragon. And now I'm already pondering ideas for the next batch!

Thursday, July 10, 2014

Ink Pad Holder, version 1


When it gets this hot outside, it takes me a lot longer to get up the oomph to walk around the block to the recyling bin for paper and cardboard. Of course I have a huge stockpile of cereal boxes by now. I also had a bunch of Distress Ink pads stacked up in a drawer, and every time I wanted a particular color, I had to go through the stacks looking for what I wanted. Last night I got an idea, and so today I created version 1 of my new ink pad holder. The cereal boxes were already flattened. I measured halfway across the face of the box and drew a line. Same for the back.


I cut along both lines. As you can see on the left, I then taped the top and bottom of the box back together to create a long, shallow open-sided box.


I covered the outside and the bottoms of the shelves with paper, but I was too lazy to cover the sides and backs of the inside. Next time I will probably put the paper on before I close up the boxes. The other thing I will need to do (as you can probably guess) to to add another layer of cardboard between the boxes, to reinforce them. My original plan was to have stacks three ink pads high, but I don't think this version can handle that.

At least I got all of my ink pads indexed, with a small label stuck to the front showing what color it is. That alone is a huge improvement.

Good thing I still have plenty of boxes.

Sunday, June 1, 2014

Lots of Cards


Unfortunately, not long ago I had cause to make some sympathy cards (I forgot to take a photo of the other one). If I remember correctly, I sponged Distress Inks on the paper, them sprayed a stamp with water and stamped onto the panels. I forgot to clean off the green ink before stamping on the blue panel, but I liked the way it turned out. Flower image by Posh Impressions, sentiment by Hero Arts.


Continuing the trend, I forget for whom I made this card. I definitely need to blog stuff right after I make it! The sentiment is from a clear Fiskars set, all other stamps are by Posh Impressions.


Here I decided to play a bit with watercolors. I wrote out the word love using a stencil and a pencil (ha!) then painted around it. I decided to go over the pencil marks with a pen instead of erasing the pencil marks, and added the word you using CTMH alphabet stamps. I sent this to my dad.


Here is the same tulip stamp as above. I colored the stamp using markers, then gave it a light misting with water and stamped it onto heavy drawing paper. The swirl stamp is CTMH. My mom got this card.


More watercolor fun... I made the background by rubbing Distress Inks pads onto an acrylic box frame (which I use for stamping, not for photos) and spritzing it with water. I then laid a piece of that heavy drawing paper (seems more like light watercolor paper to me) and smooshed it around to soak up the wet ink. I love the effects I get with this tchnique. The woman is painted using Distress Inks too. She and the sentiment are by Art Impressions. I actually inked up each question separately and used a stamp positioner to get them where I wanted them. The original stamp has the questions in two longish lines. On the insid of the card is the rest of the sentiment: "yes, and you?" This was for my sister.


I used the same watercolor background technique here, but once the paper was dry, I ran it through my Cuttlebug with a swirly embossing folder. I really love this look! The scenic stamp is by Joan Wear, the starfish is Posh Impressions. I covered the starfish with a thick layer of Glossy Accents and popped it up with foam tape. This became a birthday card for a friend who is originally from the Boston area (I figured he might like the lighthouse). 

Gifts


Wow, I have a lot of catching up to do! This is a pinwheel baby blanket knit in a cotton blend. Little Sloane was born a couple of months ago, so I am way behind. The pattern is easy but becomes tedious the longer each round becomes (you start knitting in the middle and increase stitches every other round). Copious notes are on my Ravelry page.


It has been my policy for many years now to also make a gift for any older siblings when new babies come along. Sloane's sister got this little bunny, also knit in cotton blends. Again, there are plenty of notes on my project page on Ravelry.


These are the cards I made to go with the gifts. The mother and baby stamp is by Stamp Oasis, the bunny is Close to My Heart. I rather doubt either stamp is still availble.

Tuesday, March 11, 2014

Baby Gifts


Going back in time a little to show you some things I didn't share at the time. This teddy was a first birthday present for an adorable little boy. I used Lion Brand's Fisherman's Wool for the bear, so unfortunately it can't go in the washing machine; it was all I had on hand. The mom has since told me the bear's name is Bud and that he goes everywhere Ethan goes. :-) The knitting pattern is availble on Ravely and is called Big Bad Beauregarde Bear. Sorry, I still haven't figured out how to make links in this app. It's a wonderful pattern, with everything knit in the round and no sewing to do. I tried to make the card match. I used a bear stamp from the Posh Impressions Circus set, adding colored pencil because I didn't get good coverage when I stamped it. I didn't want to use googly eyes and run the risk that little Ethan might pull them off and put them up his nose or something, so I used a tiny hole punch to make white circles and drew in the black dots. The greeting is by Darcies Country Folk, and the paper was something  i picked up at Target for $1 (package of something like 12 papers).


This was a welcome to the world gift for a baby born last month. I chose the colors based on the layette the parents had picked out. It's just a big garter stitch square with attached i-cord trim. The yarn is a cotton/acrylic blend.


This is the card I made to go with the blanket. The stickers are by Suzy's Zoo.

I've been up to lots of other mischief lately and hopefully will do another post soon. I hope everyone is having a great day.


Saturday, February 15, 2014

My Valentines


This is going to be a long post, because I have a lot to share with you. This year I got things in gear early enough to not only send out valentines cards to my parents and sister (and they arrived on time!!) but I also made gifts for the girls. One thing that helped was that I used the same basic design for each of the cards. I am also pleased to tell you that I used up the paper with circles cut out that I had left over from the cards I made for Cards for Hospitalized Kids (the guitar-playing dog). The card above was for my father. The white hearts are by Posh Impressions (a border stamp). The cat is by Eat Cake  Graphics. I stamped him twice, once on plain white paper, and once on patterned paper, to which I added some more dots and some hearts, using a ZIG pen. I think the ladybug sticker is by Stickopotamus, but I might be wrong. The hearts on the red cardstock in all of the cards were inked with VersaMark ink and embossed with white embossing powder. All sentiments were done on the computer. All coloring of images was done with Prismacolor pencils.


My sister's card used a heart stamp by Close to My Heart. The bunny is by Darcie's country Folk.


My mother's card uses a heart by Pacific Stamp Exchange (now sadly out of business) and a bear stamp from Darcie's.


The card on the left was for Liat, and uses a heart stamp by CTMH. The lion stamp is from Stampin Up! and the crown sticker is by Mrs. Grossmans. The hearts on Meital's card (on right) are by Darcie's and the elephant is from the same SU set as the lion.


I would never use "sticker sneeze" (doesn't it just look like that, lol?) on a card, but I figure anything goes on an envelope. I made the pillow gift boxes using a template I found on the Internet. I printed it onto cardstock, then coated the back of the cardstock with glue from a gluestick. I adhered CTMH paper to the back, then scored and cut out the template. The flower stamp is also by CTMH, and was stamped onto watercolor paper that had been colored with Distress Inks and then spritzed with water. The purple embossing powder is by Stampendous. 


I made fingerless mitts for the girls using the leftover yarn from their favorite socks. Meital's was Regia Silk, and as you can see I even had a tiny bit left from each 50 gram skein, after making one sock and one mitt from each skein. I think this will be a great way to use up all of the leftover yarn from making standard ladies' size socks. The mitt pattern is based on a free pattern on Ravelry called Mitt Envy, though I left out the cable decoration. If you are on Ravelry, you can find my detailed notes on my project page.


And last but not least, here are Liat's mitts. I was worried (as it turns out, possibly for no good reason) that I wouldn't have enough yarn, so I added some blue of the same yarn as a design element. The yarn (both colors) is Piedmont Yarn's Oakland Wildsocks, a very nice yarn. While Meital got her Valentine's Day card and gift when she came down for breakfast, Liat didn't get hers until late afternoon. Good thing because I didn't finish these until late morning on Friday!

If you stuck it out all the way until the end, thank you! I hope all of you had a great Valentine's Day and a lovely weekend.


Wednesday, February 12, 2014

My Kind of Cooking


I'm doing my favorite kind of cooking...cooking up a surprise for my girls! After printing out the pillow box template at Homemade Gifts Made Easy onto light cardstock, I covered the back with glue (good old UHU glue stick) and added some patterned paper. I am using the medium size template, and one piece of 12" x 12" paper was enough for both boxes. I used a piece of cork for a mat and traced around the dotted lines with a bone folder (not sure why it's called that, it can't actually fold bones and it is probably made of plastic. Hmmm...). The cork is cushier than that green cutting mat and made it easier to score the template. Then I cut out the box along the solid lines.


Working on something to go in the boxes. Can't make a gift box and not put anything inside! Using leftover sock yarn, of which I have a ton and a half. I need to make a lot more of these.


And of course, cards to go with the gifts. Gotta make sure everything is ready by Friday! What are you cooking up today?


Monday, February 3, 2014

Let's Chill


A good friend of Meital's has a birthday coming...she really wants a chinchilla for a pet (not going to happen, from what I hear) so I made this card for her, with suggestions from Meital, who hand wrote the message. It says Mazel Tov, which is what Israelis wish one another on their birthdays. I found the image online, and if it's not really a chinchilla, please don't tell me! Hopefully it is, or at least looks enough like one that Yasmin will like it.

I used OWH sketch #160 for the layout. Stickers are Mrs. Grossman, speech bubble stamp by Art Impressions. I used a Cuttlebug embossing folder on the pink cardstock. The pink patterned paper is discontinued Close to My Heart. 

One fine day I will finally use up all of my old paper and be able to get something that was printed in this century!

Sunday, February 2, 2014

Card Bowl Third Challenge


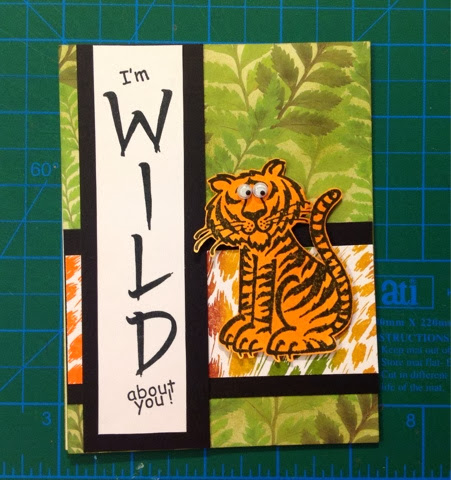
Alrighty, last post of the day, I promise! For the third and final challenge of the Operation Write Home Card Bowl, we needed to use the newest sketch, released just this morning, #210 and make, once again, a masculine card suitable for sending to men or boys. I was very excited about dusting off my Posh Impressions stamps, which haven't seen much action in recent years (long story, a problem with fading ink not with the stamps). The stamps I used: tiger, sentiment, and animal print, are part of the Playful Posh Circus set. The fern backfround paper had a white background, but it competed for attention with the animal print, which I really wanted to use. Thanks to one of the many very helpful videos on the OWH YouTube channel, I got the idea to mute the background and make it more of a tone on tone look by sponging over with Peeled Paint Distress Ink. I think it works. I used Memento Tuxedo Blank ink and a multi-colored Kaleidacolor ink pad for the animal print. I stamped the tiger on pale orange cardstock, then boosted the color with a little Wild Honey Distress Ink. After fussy cutting him, I popped the tiger up with 3M foam tape, also known as "the Precious."

I hope you're having a great day! Enjoy the Super Bowl (or not). I would enjoy watching, but it will be broadcast live here, which means about 1:30 a.m. So someone out there have some yummy munchies for me, okay? 

Card Bowl Second Challenge


The second Card Bowl challenge is tied to this month's Our Daily Bread Designs challenge on the OWH Stars and Stamps blog, to use brown as a main color. I hope this qualifies! I embossed the image (Art Impressions) in white embossing powder and then painted the barn with bleach. I have no idea who made the wood grain paper, but it is as ancient as most of the rest of my paper stash. I imagine someone out there makes something similar, if not better.

Not Quite Valentines


As always, I have trouble making deadlines when it comes to cards...since these only just went in the mail today to Cards for Hospitalized Kids, I made them look Valentine-ish without actually using the V word. So hopefully they will be fun to get even after the holiday has come and gone. I used some metallic corrugated paper picked up at my local art store, and for the cards with the bear, some very old mini doilies. The bear stamp is by Penny Black. I used leftover scraps from my Christmas cards (I sponged the white cardstock that had been dry embossed with pale pink to change it up a bit) for the panel on the side of the card.

For the cards on the right, with the dog, I used a digital stamp by Birdie Brown that is no longer available. The sentiment is also one of hers. Now I have lots of red and black cardstock with circles cut out, so you can expect to see them featured in another card design soon. I fussy cut the dog, and while I love the way it turned out, it was a heck of a lot of work! As was trying to mount the little guy on foam tape (those paws are teeny tiny!).

The images on both cards were colored in with Prismacolor pencils, and both cards use OWH sketch #206.

Are you making Valentines? I need to get busy on some cards for my family!

Card Bowl First Challenge


In honor ot the 2014 Superbowl, OWH is having a Card Bowl, with three challenges. The first is to make a masculine card (for men or boys) that in some way reflects one of the two teams playing in the big game, the Seattle Seahawks or the Denver Broncos. While the Seahawks did eliminate my San Francisco Forty-Niners in the semi-final, I just can't bring myself to root for the Broncos. So here is my Seattle-inspired card. The orca is a sticker from a set of Seattle-related stickers that someone gave me years ago. I think the water paper is by Hot Off The Press, but I'm not sure. Sentiment is from a Hero Arts set. At first I wanted to make a card depicting the Seattle skyline, with a computer-generated sentiment that said, Long Time No... But then I decided that might be weird. What do you think?

Tuesday, January 14, 2014

In Progress


It has taken me a long time to realize that I don't have to wait until projects are finished before I blog about them! So, here are some, yes only some, of the things I am currently making. Above is a little teddy bear (nearly finished now) that will soon be making his way to a little sweetie who is about to celebrate his first birthday. Pattern is availble on ravelry, and is called Big Bad Beauregarde Bear, by bjfromnv. Unfortunately, I have not yet figured out how to do links in the Blogger app. I am using Lion Brand Fisherman's Wool.

Hmm, this picture looks a bit blurry to me, if it does to you, too, I apologize. This is a crocheted (Gasp!! Shock!) blanket made up of leftover scraps of worsted weight acrylic yarns, for me. Turns out I live with a blanket thief, so desperate times call for desperate measures, Abubu.... (Ha, name that Disney movie).

I am also making some Valentines to send to Cards for Hospitalized Kids. Stamp is an old one by Penny Black. I got the cool metallic corrugated cardstock at my local arts and crafts store. The red and white (soon to be pink, thanks to Distress Inks) scraps were left over from my Christmas cards. Gotta stay on top of those scraps or they multiply like bunnies!

I actually do have some finished things I could show you, too. But not in this post, of course. This is for in progress only. Hope the day you've got in progress is going beautifully.


Wednesday, January 8, 2014

Stripes


Trying to use up some scraps before they get out of control. I used OWH sketch #205 for this card. The image is digital, colored in with Prismacolor pencils. This also qualifies for the Our Daily Bread Designs monthly challenge to use stripes. If fifty people meet the challenge, ODBD will pay for the shipping on two boxes of cards sent by OWH to our heroes serving overseas.

Tuesday, January 7, 2014

Operation Penguin


I made this card for Operation Write Home after a call was sent out for penguin cards for a certain Brigagier General who happens to love the birds. The main stamps (snowy background, penguins and iceberg) are by Posh Impressions. Water is by Darcie's, speech bubble by Art Impressions. The sentiment is by Stampendous. I made the textured pink paper using the Cuttlebug my lovely and generous friend Caroline gave to me this past summer. I am having such fun with that thing!

Saturday, December 14, 2013

Just Because


If this photo looks blurry to you, please let me know in the comments. The original photo is in focus, but as I view it here in the Blogger app, it looks blurry. Sorry about that.

This is for my parents. I try to send them a card every couple of weeks. I used the Operation Write Home sketch #201, which I like quite a lot and plan to use again soon, to start building up a stock of cards for OWH. The stamp is by Art Impressions, and the heart-shaped brad was a gift. I sponged dark green ink onto the green and white gingham paper to cut down on the brightness of the white, and used the same ink to stamp the house and the sentiment (Hero Arts).

Tuesday, November 19, 2013

Slanted


Back again with more cards, this time using OWH's sketch #143. On this first one, I stamped the sentiment too close to the edge and had to make the slants go in the other direction. Oops! I think it came out okay. Old papers, as usual, and the sentiment is from a clear stamp set by Hero Arts. This is for my parents.


These two slant the right way. More old papers (yawn) and -hey! - some fairly new washi tape (navy with yellow stars) that I stuck down on white paper and trimmed. Hero Arts sentiment from the same set mentioned above. One of these became an Any Hero card for OWH, the other went to my pen pal Tom of Wish of a Lifetime. By the way, I got my first letter from Tom today! What a pleasure to get a lovely, handwritten letter from a new friend. It was the highlight of my day.


This one uses some zig zag trims I got in a packet of scrapbooking stuff years ago. This is definitely not the blog to visit when you want to see all the latest papers, inks, techniques and all that. I stamped the clouds (Close to My Heart) in light blue on the blue paper so they would show but not compete with the zig zags. The sun (by Printworks, I think) was stamped onto yellow paper and cut out, then addeed to the card. Sentiment from the same set mentioned above. This one is going to Cards for Hospitalized Kids. I actually made one last card using this sketch, also for CFHK, but I haven't photographed it yet. I used a rainbow idea for that one, using a Posh Impressions border stamp and various colors of Distress Inks on a piece of glossy cardstock. I will try to share that one in my next post.

Friday, November 8, 2013

Big Help


This past week was the second time I used my system of randomly selecting a card sketch (I use the fabulous collection of sketches at Operation Write Home) and then spending the week making cards based on the sketch. As you can see, I was able to get a lot of cards made this week! It was so easy to just dive in, since the design was already decided. And the more cards I made, the more ideas I got. First of all, the random number generator selected 175, so that's the sketch on which I based all of these cards. The first card is for my new pen pal, Tom B., with whom I was matched with the help of the Wish of a Lifetime organization. The patterned paper and stamps are very old Close to My Heart items. The most interesting thing about this card is that I used a trick I found online (probably on Pinterest) of painting plain brads with nail polish. It works great. I just stuck the brads in a dry kitchen sponge while I "painted" them.


This next card will go to Cards for Hospitalized Kids. I used my Cuttlebug (a million thanks to Caroline, the most generous person I know!) to make the dotted background. The snowman and little house are stamps from Darcies, and the sentiment is part of an OWH fundraiser set from Stampers Best.


This will be an Any Hero card for Operation Write Home. It uses more ancient CTMH paper, plus the fabulous set by Stampers Best. You can see I began deviating even further from the sketch when I didn't combine four small squares to make the larger square here.


These two Any Hero cards use very old papers from Keeping Memories Alive. Even after all of the paper purging and scrap wrangling I've done, I still have papers that are over fifteen years old. Crazy. The tree image is by Art Impressions. I sponged the backgrounds behind the trees with Distress inks.


One of these is a card for Sandy, the founder of OWH, and the other ... Well, it turned out so Spring-like, I thought I'd better save it for, you know, Spring. Card on the left uses more KMA papers, the one on the right uses purple CTMH; I'm not sure about the yellow and white. Sentiment is by Posh Impressions.


This last card is for the postal workers where Sandy takes her dozens upon dozens of OWH boxes to be mailed. I hope they'll get a kick out of the Israeli postage stamps. Patterned paper by Hot Off the Press, sentiment stamp by Posh Impressions.

And there you have it! I am so pleased with the way this system is working for me. I've got a new sketch number and am raring to start on a new week's worth of cards! 

And in case you're wondering...yes I am still knitting. Every day, in fact. I am almost finished with a big - and I do mean BIG - project, which I will share next month after it has been gifted. It has been a pleasure, but after a month and a half of working on only one project, I am more than ready to get some more diversity going.

Have a wonderful weekend!